Your Guide to Perfect Closet System Design and Organization

A great closet system isn't about fancy drawers or expensive hardware. It's about designing a smart, organized space that simplifies your daily routine. The entire closet system design process starts with an honest look at what you own and the physical space you're working with. Getting this part right is the blueprint for a closet that's efficient, organized, and finally free of clutter.
Starting Your Closet Design with a Solid Foundation of Organization
Before you can design the perfect closet, you must know exactly what you're organizing. People often jump straight into picking shelves and rods without a clear plan, only to end up with a system that doesn't fit their organizational needs. The real starting point is a two-step process: a ruthless wardrobe decluttering, followed by meticulous measuring. This initial groundwork is what separates a truly functional, organized closet from one that just looks nice on the surface.
This focused approach to home organization has exploded in popularity. The global market for closet organizers was valued at USD 4,033.3 million in 2025 and is expected to more than double to a staggering USD 8,529.7 million by 2035. This growth shows a shift in how we want our homes to function—we're craving personalized, organized spaces. You can discover more insights about the closet organizers market and see how this desire for order is shaping home design.
Take a Hard Look at Your Wardrobe for Better Organization
Your first move isn’t with a tape measure—it's with your clothes. You need a realistic inventory of what you actually wear to create a home for everything. Pull everything out of your closet. Everything. Seeing it all in one pile is often the shock needed to realize just how much stuff needs organizing.
Now, sort it all into three distinct piles for ultimate closet organization.
- Keep: These are the items you love, wear regularly, and that fit you well. They are the non-negotiables that your new closet system must be designed to organize.
- Donate/Sell: Clothes that are in good shape but no longer serve you. Maybe your style changed, they don't fit, or you haven't touched them in a year. Let them go to make room for what you truly need.
- Discard: Anything that's worn out, stained, or damaged beyond repair.
This isn’t just about clearing space; it's about collecting data for your closet organization plan. You’ll get an accurate count of hanging items, folded clothes, shoes, and accessories. You'll know if you need more rod space for dresses or more drawers for workout gear.
Pro Tip: As you're sorting, group your 'Keep' pile into smaller categories—work blouses, casual t-shirts, formal wear, jeans. This micro-organization makes it much easier to plan specific zones in your new closet design.
Measure Your Space with Precision
Now that you know what you need to organize, it’s time to figure out where it will all go. This is where accuracy is non-negotiable. Grab a tape measure, a notepad, and a pencil.
Don't just get a quick width and height. You need the full picture of the space.
- Wall-to-Wall Width: Measure across the top, middle, and bottom of the closet. Walls are rarely perfectly straight, so always use the smallest number for your official width.
- Floor-to-Ceiling Height: Same deal here—measure in a few different spots and take the shortest measurement.
- Depth: Measure from the back wall to the front edge of the closet opening. This is critical for choosing components that won't block the door.
- Door Clearance: Note your door type (swinging, sliding, bifold) and measure how much space it takes up when open.
- Obstacles: Mark the locations of light switches, outlets, vents, or any other fixtures you have to work around. Planning for these now prevents headaches during installation.
Mapping Out Your Ideal Organized Closet Layout
With your measurements and inventory, it's time to become a closet architect. This is where you sketch out a plan and turn raw numbers into a functional, personalized space. The goal is to design a layout that mirrors your daily routine, making everything intuitive and easy to find, which is the cornerstone of great organization.
Think of it like planning an effective room layout; the principles are the same. A well-organized closet should feel like a natural extension of your room, not a separate, chaotic space.
This flowchart highlights how the best organizational layouts start with a solid foundation: knowing what you're keeping and the exact space you have.
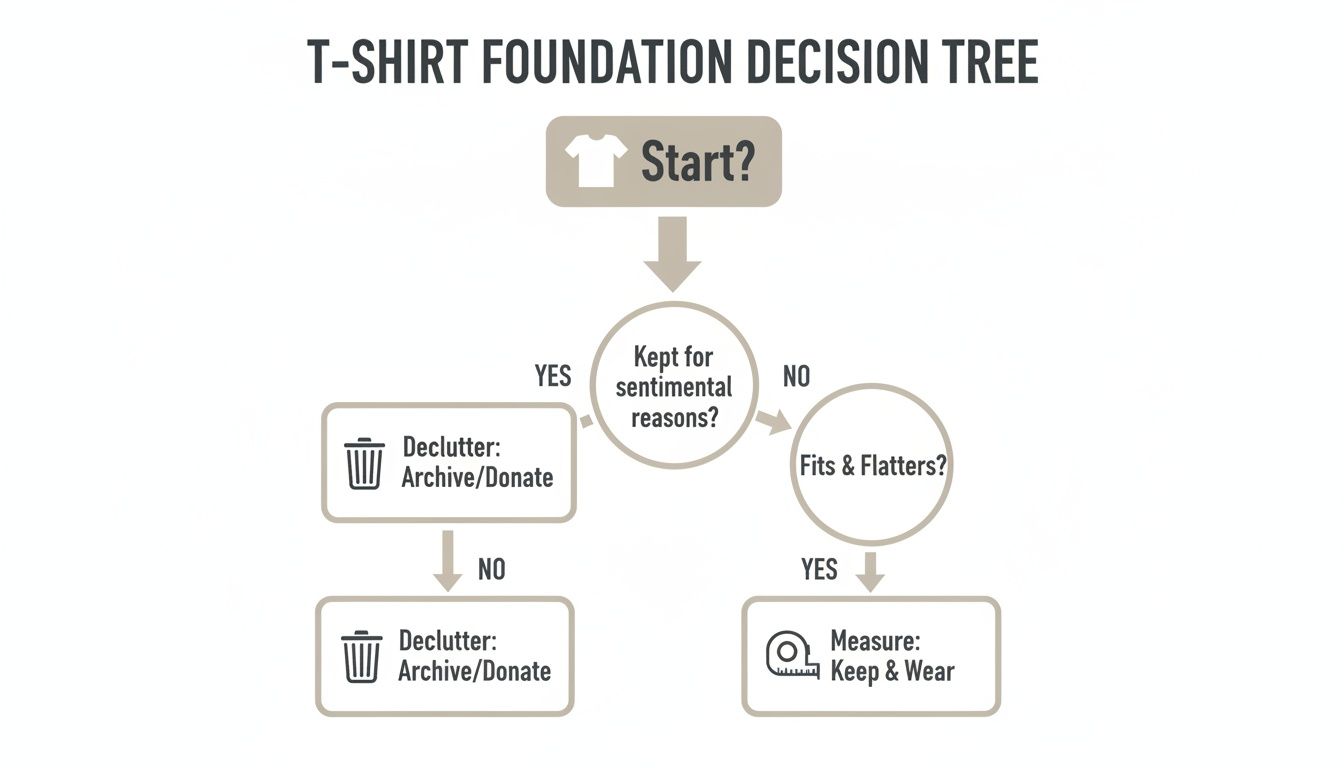
As you can see, the path to an organized closet starts long before you pick out your first shelf.
When designing a closet, the size of the space dictates the organizational strategy. What works for a sprawling walk-in is impractical for a small reach-in. Let's break down the best approaches.
Closet Layout Strategies By Size
This table outlines common organizational strategies tailored to different closet sizes.
| Closet Type (Size) | Primary Organizational Goal | Key Components | Pro Tip |
|---|---|---|---|
| Small Reach-In | Maximize vertical space | Double-hang rods, high shelving, skinny shelf tower | Use the back of the door for shoes or accessories to free up internal shelf and rod space. |
| Medium Walk-In | Create distinct organizational zones | L-shaped or U-shaped design, mix of rods & shelves | Dedicate one wall to long-hanging items and another to shorter items to keep things tidy and organized. |
| Large Walk-In | Build a boutique-like experience | Central island, dedicated shoe wall, vanity/bench | Incorporate lighting inside drawers and under shelves to elevate the feel and improve organization. |
No matter the size, a thoughtful layout can make any closet feel more spacious and organized.
H3: Designing for a Reach-In Closet
Small reach-in closets are all about one thing: thinking vertically. Your goal is to use every inch to maximize organization. Most standard reach-ins have a single clothing rod, which is a massive waste of potential storage space.
The most effective change is installing double-hanging rods. This instantly doubles your hanging space for shirts, blouses, and folded pants. I often suggest organizing work clothes on the top rod and casual wear on the bottom—it creates a logical system that simplifies getting dressed.
To enhance organization further, add a narrow shelving tower. It can break up hanging space and provide a dedicated spot for folded sweaters, jeans, or handbags. There are many smart shelving ideas for closets that can completely overhaul a tiny space.
H3: Planning a Walk-In Closet Layout
A walk-in closet is a luxury, but the extra space can become a disorganized mess without a plan. The secret to walk-in closet organization is creating dedicated "zones" tailored to your wardrobe.
Here are a few zoning strategies that work wonders for organization:
- By Occasion: Use one wall for professional attire and another for casual clothes. This organization method saves time.
- His & Hers: In a shared closet, divide the space. Giving each person their own area significantly reduces morning chaos.
- By Item Type: Group all long-hanging items (coats, dresses) in one section. Put all folded items on shelves. Dedicate another area entirely to shoes. This organized approach makes finding things faster.
If you have the floor space, a central island is a game-changer for organization. It provides a surface for folding laundry and introduces drawer storage for accessories like belts, scarves, and jewelry.
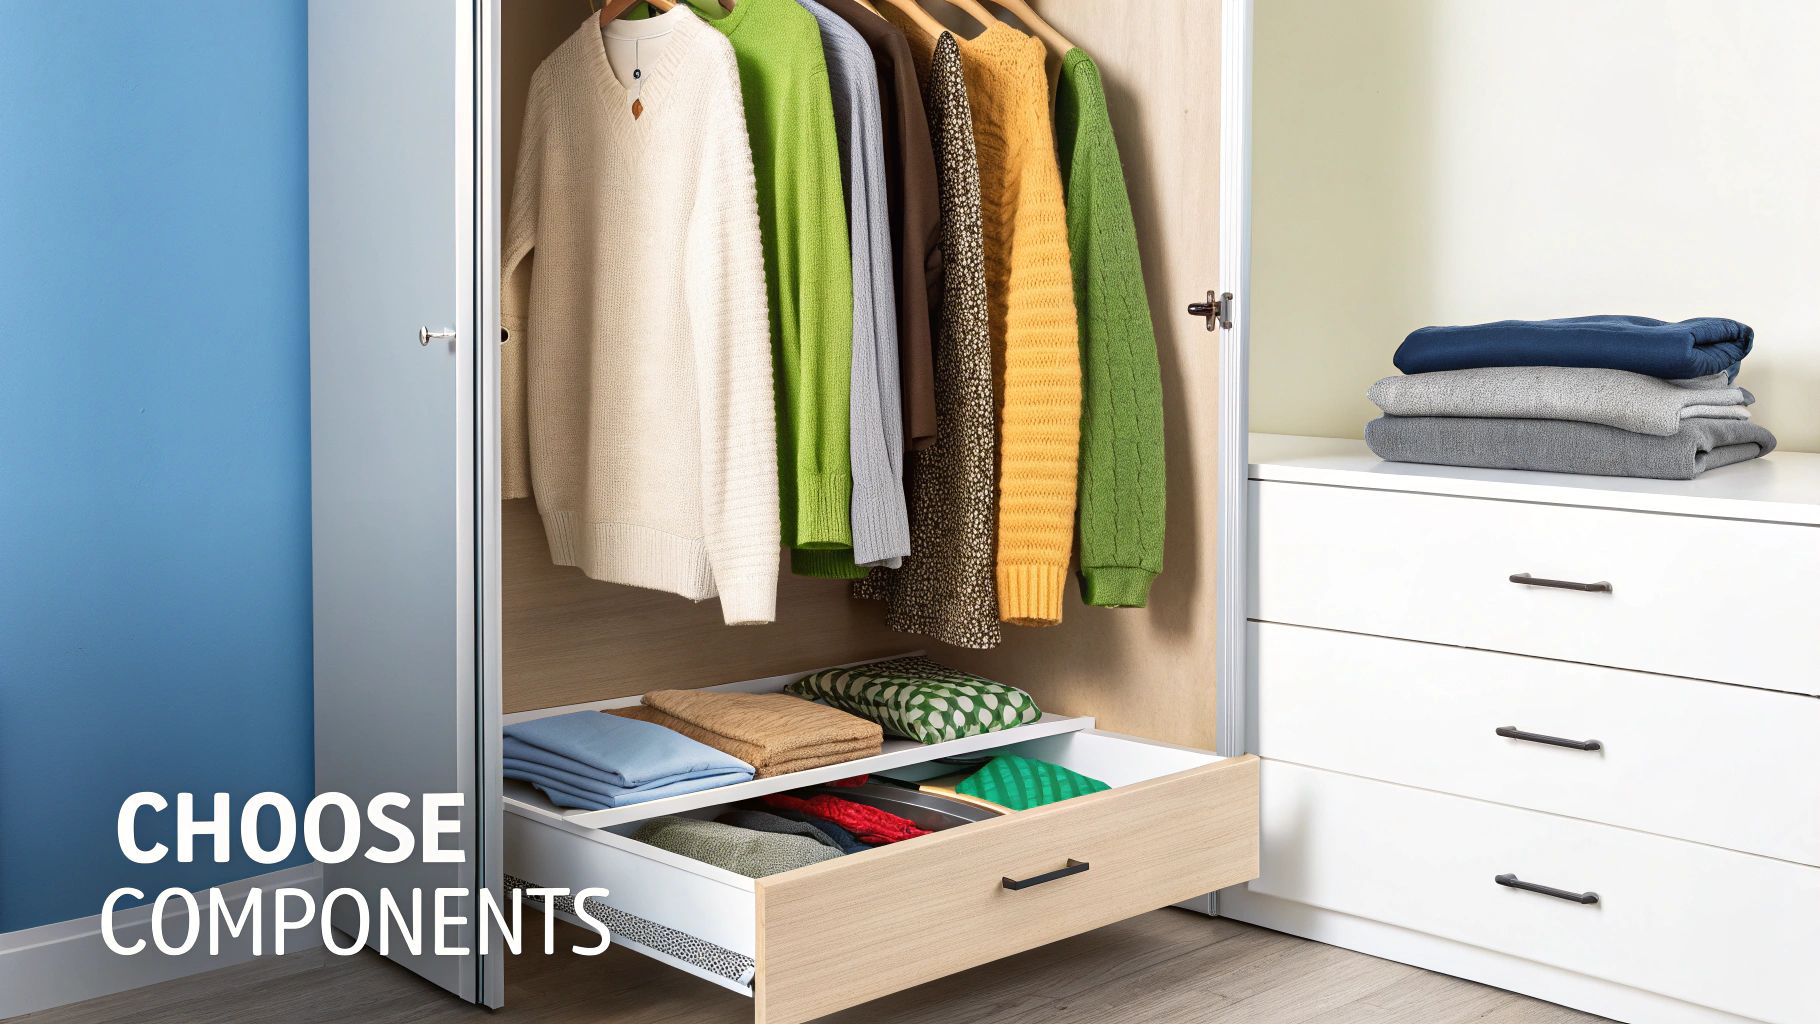
Choosing the Right Components for Your Organized System
You’ve mapped out your closet layout. Now for the fun part: picking the building blocks that bring your organized design to life. The components you select are the heart of your new closet. They determine how you’ll store, see, and access your clothes, turning your organizational plan into a functional reality.
It’s no surprise that people are more focused on organization than ever. The closet organizer market is expected to reach $8.25 billion next year and skyrocket to $11.15 billion in just five years. This boom is fueled by the desire for a less cluttered life, with modular and multi-use designs leading the charge in home organization. You can read the full research about these closet market trends if you want to geek out on the data behind our collective need for order.
Material Choices That Define Your Closet
The material you choose sets the tone for your closet's look and durability. This decision affects both your budget and the final aesthetic.
- Wire Shelving: This is your go-to for a budget-friendly project. It’s lightweight, easy to install, and offers great ventilation. The downside? It can leave lines on folded clothes and doesn't feel as premium.
- Laminate (MDF): A fantastic middle-ground choice. Laminate gives you a smooth, solid surface and comes in a huge range of finishes. It offers a custom, built-in look without the hefty price tag of solid wood, making it a popular choice for organized closets.
- Solid Wood: If you're aiming for a timeless, high-end closet, solid wood is the ultimate choice. It's incredibly sturdy but is also the most expensive option.
A Personal Takeaway: For most closets I've designed, laminate systems hit the sweet spot. They deliver a clean, high-end vibe that is perfect for organization without the serious investment of solid wood, making them a practical choice for most homes.
Hanging Rods: The Backbone of Your Wardrobe Organization
Let's talk about the most valuable real estate in your closet: hanging space. The trick is to customize it based on what you wear. A little strategy here can literally double your storage and organization capacity.
Single-Hanging Rods are a must for your longer items. You need at least one section with a single rod to properly store:
- Dresses
- Long coats
- Jumpsuits
- Formal gowns
Typically, a single rod is mounted about 66 inches from the floor, leaving room underneath for shoe organization or storage bins.
Double-Hanging Rods are the undisputed champion of space-saving organization. This setup gives you two tiers of hanging space for shorter clothes. A common placement is the top rod around 80 inches high and the bottom rod at 40 inches, creating an organized home for shirts, blouses, skirts, and pants folded over a hanger.
Drawers vs. Shelves: The Great Organization Debate
Should you go with drawers or open shelves? The answer depends on what you're storing and your organizational style. The best closets always have a healthy mix of both.
Drawers are brilliant for hiding small items and keeping things contained. They are perfect for organizing:
- Socks, underwear, and other delicates
- Workout clothes and folded t-shirts
- Accessories like scarves and belts
Open shelving, on the other hand, is about easy access. It lets you see what you have at a glance, which is ideal for organizing items you grab regularly. I always recommend shelves for:
- Bulky sweaters and sweatshirts
- Stacks of folded jeans
- Handbags and clutches
For a deeper dive into organizing your closet, you might be interested in our guide on the best closet organizer systems to find what suits your needs.
Game-Changing Accessories for Superior Organization
Once the basics are in place, clever accessories can take your closet organization from good to great. These extras solve annoying storage problems and add a touch of everyday luxury.
- Valet Rods: A small, extendable rod perfect for staging an outfit, holding dry cleaning, or keeping items handy while packing.
- Pull-Out Racks: Specialized racks for pants, ties, or scarves keep items neat, wrinkle-free, and easy to see. A pull-out pant rack is a favorite for streamlined organization.
- Jewelry Trays: Felt-lined drawer inserts with dividers turn any standard drawer into a beautiful, organized home for jewelry, protecting everything from tangles.
Smart Strategies to Maximize Every Inch for Better Organization
A great closet system provides the structure, but the real magic is how you use it. A truly functional closet design goes beyond rods and shelves—it's about clever tricks that squeeze organizational value out of every inch. This is where we get into the pro-level tips that take a closet from just "organized" to genuinely exceptional.
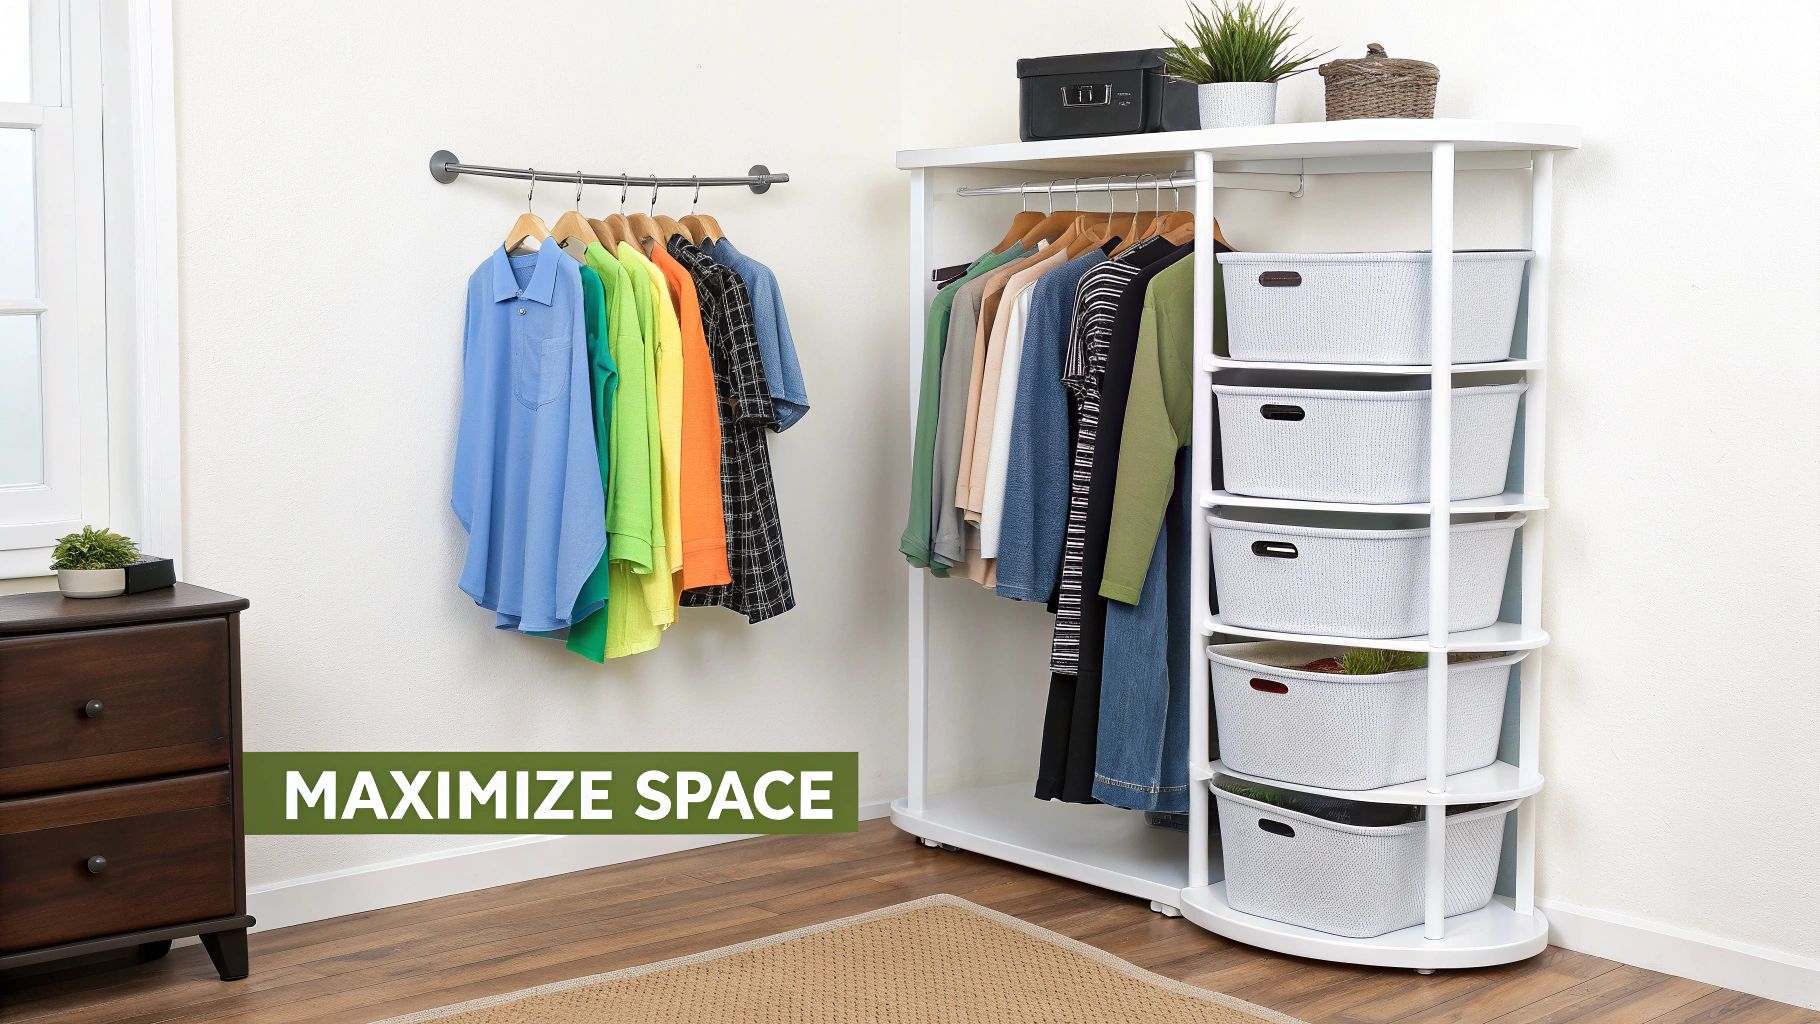
Think Vertically to Conquer Clutter
The most under-utilized real estate in any closet is the vertical space. We naturally focus on what's at eye level, leaving untapped storage potential above and below. This is a missed opportunity for organization, especially in smaller closets.
One of the easiest organizational wins is your hangers.
- Tiered Hangers: A game-changer for skirts and trousers. Instead of one item hogging rod space, you can hang four or five in the same vertical footprint.
- Stackable Bins: On shelves, clear, stackable bins let you use the full height between shelves without creating a teetering, messy pile. This is key for sweater and t-shirt organization.
- Over-the-Door Organizers: Don't forget the back of the door! It's the perfect spot for shoe organization, freeing up prime real estate on your main shelves and rods.
By thinking in layers, you can massively increase your storage capacity. For a deeper dive, there's a wealth of information out there on https://moralve.com/blogs/news/space-saving-clothing-storage to get you started.
Reclaim Awkward Spaces for Organization
Every closet has them: weird corners or a high, out-of-reach top shelf that becomes a black hole. A smart organizational design finds a purpose for them.
Turning a tricky corner into a functional storage spot is one of the most satisfying parts of closet design. It feels like you've discovered hidden organizational space.
Those super-high shelves are perfect for long-term or seasonal storage. This is the ideal home for bulky winter coats, luggage, or sentimental items. Use clearly labeled bins for easy identification.
Awkward corners can be put to work, too. A curved hanging rod creates a continuous flow, while custom-cut L-shaped shelves can turn a dead corner into a nook for handbags. Learning to see organizational potential is key. This practical guide to maximizing space with partitioning systems offers concepts that can spark ideas for your closet.
Illuminate and Expand Your Space
Never underestimate the power of good lighting in an organized closet. A dim, shadowy closet feels smaller and makes finding things difficult. Good lighting is an organizational tool.
Adding LED strip lighting under shelves or along vertical panels is a fantastic way to light up your entire wardrobe. It gets rid of dark corners and makes everything easy to see. Many systems are battery-operated, so you don't need an electrician.
A well-lit closet doesn't just work better; it feels better. It elevates the experience of getting dressed and makes your newly organized space feel brighter and bigger.
Budgeting and Installing Your New Closet System
With your closet design locked in, it’s time to bring that organized vision to life. This is where the planning pays off. The next steps are practical: figuring out the budget and getting the system installed correctly.
Getting a handle on costs and knowing what the installation involves are keys to a successful project. Whether you're a DIYer or calling a pro, a clear understanding of this phase will make everything smoother.
Creating a Smart Closet Budget
Closet system costs vary widely. You can spend a couple hundred dollars on a simple wire kit or several thousand on a custom masterpiece. That's why setting a budget before you start is so important.
For a standard 6-foot reach-in closet, you could be looking at $200-$300 for a basic wire or simple laminate system. If you go with a custom closet company for that same space, the price can jump to $1,500 or more.
A well-planned budget isn't just about finding the cheapest option. It’s about putting your money toward the organizational components that will make the biggest difference in your day-to-day life.
Think about the trade-offs. Where can you save, and where is it worth spending more for better organization?
- Where to Save: Drawers are the priciest part of any system. Opting for more open shelving can dramatically cut costs. You can also save by handling the installation yourself.
- Where to Splurge: High-quality hardware is a game-changer for organization. Smooth, full-extension drawer glides or a slide-out pants rack can elevate the whole experience and are often worth the cost.
Closet System Budget Breakdown
Here’s a rough breakdown of what you can expect to spend on a typical 6-foot reach-in closet depending on the type of system.
| System Type | Material Cost Estimate | Installation Cost (Pro) | Best For |
|---|---|---|---|
| Wire System | $150 – $400 | $200 – $500 | Budget-conscious projects and ventilated storage |
| Laminate/Melamine Kit | $300 – $800 | $400 – $700 | DIYers looking for a built-in look and good organization |
| Modular Wood System | $600 – $1,500 | $500 – $900 | Flexibility and a higher-end, furniture-like feel |
| Fully Custom Build | $1,500+ | Included in price | Perfect, tailored organization for unique spaces |
These are just estimates. The final cost will always depend on the complexity of your design, the accessories you choose, and local labor rates.
Your Essential Installation Checklist
A solid installation is the final, critical step. A secure, level installation is non-negotiable for safety and the long-term durability of your organized closet.
Prep work is everything. Before starting, get the closet ready. Tear out the old shelf and rod, patch up holes, and apply a fresh coat of paint. Starting with a clean slate leads to a more professional result.
When your space is prepped, it's time to find the wall studs. This is the most important part of the installation.
- Find and Mark Your Studs: Use a good stud finder and mark the location of every vertical wood support. This is the structural backbone you'll anchor your system to.
- Draw Your Guidelines: Use a long level to pencil in light, horizontal lines for your main mounting rail. Double-check these against your design plan.
- Mount the Foundation: Attach the main hardware (usually a top track) directly into the studs with the provided screws. If a spot doesn't line up with a stud, you must use a heavy-duty drywall anchor. Don't skip this.
- Add the Components: With the foundation solidly in place, build out the system. Work from the top down—hang vertical standards, click in shelves, install rods, and finally, assemble drawer units.
- The Final Check: Once it’s all together, do one last check with your level. Make sure every shelf and rod is perfectly straight for a flawless finish.
Maintaining Your Newly Organized Closet
Designing and installing your closet system is a huge win, but the real victory is staying organized. You've put in the hard work; now the key is to build simple habits to keep that calm, functional space from turning back into a chaotic mess.
Think of it less like a chore and more like a simple routine. A few minutes here and there will prevent clutter creep and save you from a massive overhaul later. A great organizational system is only as good as how you use it.
Make Good Habits Stick
The secret to long-term organization is making it automatic. You don’t need hours every week; you just need smart, easy-to-follow rules that stop clutter before it starts.
- The One-In, One-Out Rule: This classic works. For every new item you bring home, an old one has to go. This keeps your closet from getting overstuffed and ensures your organization system isn't overwhelmed.
- The Seasonal Swap-Out: Twice a year, rotate your clothes. Pack away out-of-season items and store them in bins on a high shelf. This instantly frees up prime real estate and provides a natural opportunity to declutter.
Remember, a good closet system is meant to be flexible. If a shelf isn't cutting it or you realize you need more rod space for better organization, modular systems make it a breeze to adjust things on the fly.
Don't Be Afraid to Reassess and Tweak Your Organization
Our lives change, and so do our wardrobes. The layout that was perfect initially might need adjustments. Maybe you started a new job or picked up a new hobby.
Once a year, take a critical look at your closet organization. What’s working? What’s not? Are your sweaters always tumbling into a messy pile? Maybe it’s time to add shelf dividers. Has your shoe collection grown? You could swap out a shelf for another shoe rack. That's the beauty of a thoughtful closet design—it’s built to evolve your organization right along with you.
Answering Your Final Closet Design Questions
Even with a solid plan, a few questions always pop up. Let's tackle some common ones, so you can move forward with confidence and build a closet that keeps you organized.
How Much Hanging Space Do I Actually Need for Good Organization?
A good rule of thumb is to measure the width of your clothes currently on the rod, then add 15-20%. This gives your clothes room to breathe, which is key for good organization. For most people, three to four feet of rod space is a comfortable amount.
The real game-changer for organization is dividing your hanging space by item length.
- Long-Hanging: Set aside a section with a single rod for long items like dresses and coats.
- Double-Hanging: By stacking two rods, you instantly double your capacity for shirts, blouses, and folded pants. I typically place the top rod around 80 inches high and the bottom one at 40 inches off the floor for optimal organization.
Are Drawers or Open Shelves Better for Closet Organization?
The best closets use a combination of both. It depends on what you're storing and your organizational preferences.
Drawers are perfect for corralling small items like socks, underwear, and accessories. They keep everything contained and out of sight for a tidy look.
A mix of drawers and shelves is the secret to a highly functional, organized closet. I always recommend using open shelves for bulky items you grab often, like sweaters and jeans. Reserve drawers for smaller things that would get messy on an open shelf.
Can I Install a Closet System on Drywall?
You can, but proper anchoring is critical for a safe, organized closet. The main vertical supports must be screwed directly into wall studs. A good stud finder is your best friend here.
What if a spot doesn't line up with a stud? You'll need to use heavy-duty drywall anchors rated for significant weight. I recommend toggle bolts in these situations. Never just screw the system into plain drywall. The weight of your clothes will eventually rip it right out of the wall, destroying your hard-earned organization.
Ready to transform your closet with smart, effective organization? The innovative space-saving hangers from MORALVE are designed to help you maximize every inch of your wardrobe. Start building your perfectly organized closet today at moralve.com.
Leave a comment