A DIY Guide to Installing a Hanging Closet Rod for Ultimate Organization

A solid hanging closet rod isn't just a piece of hardware; it’s the backbone of a truly organized wardrobe. We’ve all been there—dealing with the chaos of a sagging, overloaded rod or a closet where you can never find anything. Getting the installation right is the first step, but using it to create a smart organization system can turn that daily frustration into a streamlined, functional closet that actually works for you.
Getting Started: Why a Closet Rod is Your Most Important Organizational Tool

It’s easy to overlook, but a well-chosen and properly installed closet rod is what makes or breaks your entire closet organization system. It dictates the flow, capacity, and overall usability of your space. A weak, poorly secured rod is a recipe for disaster, while a strong one provides the reliable structure you need to keep your wardrobe tidy and accessible.
Think of the rod as the first building block in your journey to a more organized closet. It allows you to see everything you own at a glance, so clothes don’t get lost in a crumpled heap at the back. It’s the key to creating a space that’s both functional and easy on the eyes.
A Sturdy Rod is Non-Negotiable for Organization
We’ve all heard that dreaded crash—a closet rod giving way at the worst possible time. It’s more than just an inconvenience; it’s a clear sign that the core support system for your entire wardrobe has failed. Taking the time to invest in a quality installation from day one will save you a ton of headaches and protect your clothes from ending up in a pile on the floor.
It really comes down to what you're hanging. A closet full of heavy winter coats and denim requires a much beefier setup than one holding a few blouses and summer dresses. The first step in planning your organization is to take a hard look at your wardrobe’s weight.
One of the most common organizational mistakes I see is people overloading a standard rod without a second thought. For real peace of mind and long-term stability, you absolutely have to reinforce your setup with proper brackets and anchor it directly into wall studs, not just the drywall.
The Push for Smarter, More Organized Closets
The move toward better home organization is more than just a passing trend. The global market for adjustable closet rods was valued at USD 2.1 billion and is expected to hit USD 3.65 billion by 2033. This boom shows just how much people want smarter, more customizable storage, especially as we all try to make the most of smaller living spaces.
It’s also why so many are exploring creative DIY closet ideas to upgrade their homes.
Of course, a great closet is more than just a rod. To get the full picture, check out our guide on https://moralve.com/blogs/news/how-to-design-a-closet to learn how to plan your space from the ground up.
How to Select the Right Closet Rod for Your Wardrobe
Picking the wrong hanging closet rod is a fast track to a sagging, bent, or completely collapsed wardrobe. I’ve seen it happen more times than I can count. Getting this choice right from the start saves you future headaches and makes sure all your hard work organizing doesn't literally end up in a pile on the floor.
Think of it this way: a simple tension rod might be fine for a renter hanging a few t-shirts, but it’s going to buckle instantly under the weight of a homeowner's winter coat collection. For that job, you need a securely mounted steel rod to properly support your organized wardrobe.
Getting to Know the Core Rod Types
Before you even think about buying, you need to understand the main players in the closet rod game. Each one is built for a different job, and matching the rod to your actual organizational needs is the most critical step.
You'll generally run into three main categories, each with its own set of pros and cons when it comes to strength, installation, and what they’re best used for.
To give you a clearer picture, I've put together a quick comparison of the most common options you'll find.
Hanging Closet Rod Type Comparison
| Rod Type | Best For | Installation | Weight Capacity | Pros & Cons |
|---|---|---|---|---|
| Fixed-Length Rod | Heavy-duty storage (coats, suits), custom closets, permanent installations. | Difficult: Requires precise measuring, cutting, and drilling into studs. | High: 60-120+ lbs, depending on material and support. | Pro: Extremely strong, clean look. Con: No room for measurement error. |
| Adjustable Rod | General purpose closets, mixed clothing types, DIYers needing flexibility. | Moderate: Requires mounting brackets and screws, but the rod length is adjustable. | Medium: 40-75 lbs. The middle is a weak point. | Pro: Forgiving on measurements, widely available. Con: Can sag without a center support. |
| Tension Rod | Renters, temporary solutions, lightweight items (sheer curtains, baby clothes). | Easy: No tools needed. Uses spring tension to hold itself in place. | Very Low: 5-20 lbs max. | Pro: No wall damage, installs in seconds. Con: Unreliable for most clothing. |
Choosing the right type is half the battle. If you're looking for clever ways to use different rods, learning how a double closet rod can maximize your space is a great next step for organization.
Why Material and Diameter Are Everything
The two things that really determine a rod's strength are its material and its thickness. Don't just grab the cheapest one on the shelf—take a second to see what it's made of and how thick it is.
Steel is the undisputed king of closet rods. It gives you the best bang for your buck in terms of strength and does a great job resisting bending. Plus, it comes in finishes like chrome, nickel, or matte black to match your style. Aluminum is a lighter, rust-proof option, but it’s definitely more likely to sag over time.
Diameter is just as important. A standard rod is usually around 1 1/4 inches thick, which is perfectly fine for most closets. But if you’re hanging a serious collection of suits or heavy coats, do yourself a favor and upgrade to a 1 5/16-inch or larger diameter rod. That extra bit of thickness makes a huge difference in preventing sag.
The most common mistake I see is people completely underestimating how much their clothes weigh. Just ten heavy winter coats can easily top 50 pounds. Always, always choose a rod that can handle more weight than you think you need.
Your Personal Closet Organization Checklist
Run through this quick mental checklist before you buy anything. Answering these questions will point you straight to the perfect rod for your closet organization project.
- How heavy is your wardrobe, really? Are you hanging light blouses or a dozen leather jackets? Be honest. If your stuff is heavy, make a thick, fixed-length steel rod your top priority.
- What are your walls made of? Can you mount the hardware directly into wall studs? A stud finder is your best friend here. If not, you’ll need heavy-duty drywall anchors, and you have to make sure your rod brackets are compatible with them.
- What’s your DIY comfort level? Are you okay with measuring precisely, cutting a rod to size, and drilling? A fixed-length rod is a great project if you are. If you’d rather skip the power tools, an adjustable or tension rod is a much better fit.
- What's your budget? It’s tempting to save a few bucks, but a flimsy rod is a terrible investment. Spending a little more on a quality product means it will last for years, protecting your clothes and giving you a closet you can actually rely on.
Installing Your Closet Rod for Maximum Strength
A perfectly installed closet rod is the unsung hero of an organized wardrobe. Get it right, and you've got a reliable system for years. Get it wrong, and you're looking at a pile of clothes on the floor. Let's walk through the practical steps to get this done right, focusing on the little details that make for a professional and seriously durable result.
First things first, get your tools together. You don't need a pro-level workshop, just the basics: a good tape measure, a level, a stud finder, and a drill with the right bits. Having everything within arm's reach makes the whole job go so much smoother.
This quick guide breaks down the thought process before you even touch a drill.
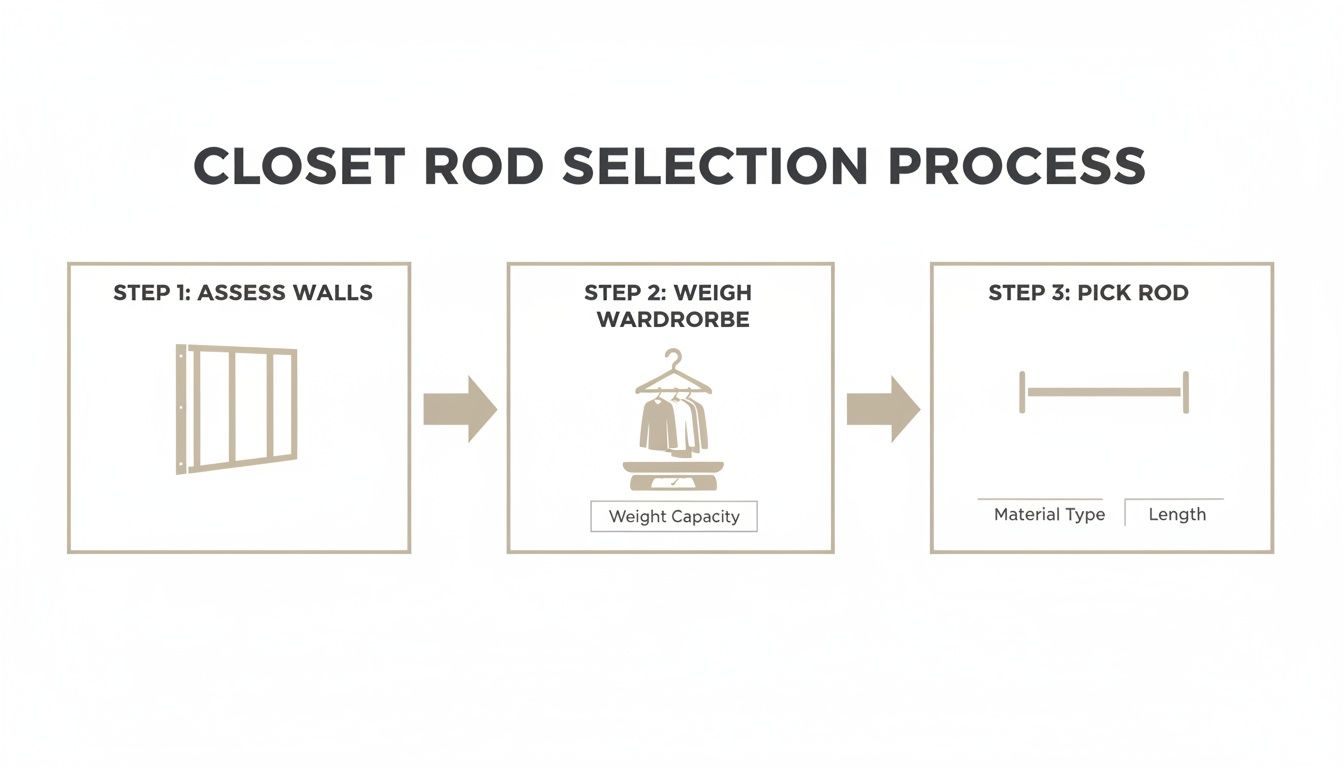
As you can see, it all starts with your walls and your wardrobe. Those two factors will point you directly to the best rod for your situation.
Finding and Marking Your Support Points
The absolute secret to a rod that won't budge is anchoring it into wall studs. These are the vertical wooden beams inside your walls, and they provide the structural backbone you need. Just screwing into plain drywall is asking for trouble; it’s simply too soft to hold any real weight.
Grab your electronic stud finder and run it along the wall where you want to install the rod brackets. When it beeps or flashes, you've found a stud. Mark the center of each one with a pencil at your desired height.
Once you know where your studs are, you can finalize the height. Here are some go-to measurements that work for most organizational setups:
- Single Rod: For long coats and dresses, aim for 66 inches up from the floor. This usually leaves plenty of room.
- Double Rod System: To really maximize your space, put the top rod around 80-82 inches and the bottom one at 40-42 inches. This is a game-changer for separating shirts, pants, and skirts.
Before you commit, grab your longest garment and hold it up. Make sure you leave 4-6 inches of clearance at the bottom. Use your level to draw a light pencil line connecting your marks on both sides of the closet. This guarantees a perfectly horizontal rod.
The Stud vs. Drywall Anchor Decision
This is where your path splits. If your bracket locations line up perfectly with the studs you found, you're in the best-case scenario for a rock-solid installation.
When you're mounting directly into wood, you’ll drill a small pilot hole (a bit smaller than your screw's diameter) and then drive the screws straight in. This creates an incredibly strong connection that can often support 75 pounds or more, depending on the hardware you're using.
But what if the studs just aren't where you need them? It happens all the time, especially in older houses or weirdly shaped closets. If that's the case, you have to use drywall anchors. But please, don't just use any anchor.
The flimsy little plastic anchors that come in most hardware kits are not your friend. Do yourself a favor and invest in heavy-duty toggle bolts or self-drilling threaded anchors. They expand behind the drywall, spreading the load over a wider area for a much more secure hold.
Even with the best anchors available, a drywall-only mount will never be as strong as one anchored into studs. Be realistic about how much weight you plan to hang if you have to go this route.
Drilling and Mounting with Precision
With your spots marked and your mounting hardware chosen, it's time to drill. Here's a pro tip: put a small piece of painter's tape over your pencil mark before drilling. This simple trick prevents the drywall from tearing and gives you a much cleaner hole.
Drill your pilot holes right on your marks. If you're using drywall anchors, make sure to follow their specific instructions for hole size and installation.
Now you can attach the mounting brackets or sockets. Hold each one firmly against the wall, line it up with your holes, and drive the screws in until they’re snug. Don't go crazy and overtighten—you could strip the hole or crack the drywall. The bracket should sit perfectly flush against the wall with zero wiggle.
Once both brackets are secure, set your hanging closet rod in place. Give it a firm tug to make sure everything feels solid. That final check gives you the confidence that your new closet organization system is built on a strong foundation.
Troubleshooting and Reinforcing Your Installation
Even the most carefully installed closet rod will feel the strain of time and weight. Knowing how to spot common problems and how to reinforce your setup from the get-go is the key to keeping it sturdy and reliable for years. A little proactive maintenance now saves you from a bigger organizational headache later.
Think of it as an insurance policy for your wardrobe. The single most important reinforcement you can add is a center support bracket. Honestly, it’s non-negotiable for any rod spanning more than four feet. Without it, even a heavy-gauge steel rod will eventually start to bow under the constant load of heavy clothes like jeans and winter coats.
When to Add a Center Support Bracket
A sagging rod isn't just a cosmetic issue—it's a sign of structural stress that’s only going to get worse. The second you notice even a slight dip in the middle of your hanging closet rod, it's time to install a support bracket. Don't wait for your organized closet to fail completely.
Putting one in is pretty simple. Just find the exact center of your rod and then locate the closest ceiling joist or wall stud directly above or behind it. You always want to mount brackets into solid wood for maximum strength.
The rule of thumb I always follow is simple: if a closet rod is longer than 48 inches, it gets a center support, no exceptions. This single piece of hardware can double the weight capacity and prevent the end brackets from being slowly pulled out of the wall.
Solving Common Installation Problems
Over the years, you might notice a few things going wrong. The good news is that most of these issues have straightforward fixes that don't require you to tear everything out and start over.
- Stripped Screw Holes: This is when a screw just spins in place and never tightens. To fix it, back the screw out, jam a few glue-coated toothpicks or some wood filler into the hole, and let it dry. Then you can drill a new pilot hole and re-insert the screw.
- Rod Pulling From the Wall: This is a big one. It means your anchors have failed. You'll need to upgrade to something stronger, like toggle bolts or heavy-duty self-drilling anchors that grip the drywall from behind.
- Wobbly Brackets: First, try tightening the screws. If they still feel loose, the problem might be weak drywall. Your best bet is to move the bracket over a few inches so you can anchor it directly into a wall stud.
Catching these problems early prevents a catastrophic closet collapse, which protects both your clothes and your walls. A well-organized, sturdy closet is a real investment in your home.
In fact, North America is the largest market for closet organizers, valued at a whopping US$ 4.2 billion. This number really shows how much people value creating functional, organized spaces. You can discover more insights about the closet organizer market to see just how big this trend is.
Reinforcing for Heavy Loads
If your wardrobe is packed with unusually heavy items—think leather jackets, racks of formalwear, or military uniforms—the standard approach might not be enough. For these situations, you'll want to take your reinforcement to the next level to support your organizational system.
Instead of one center support, install two, effectively dividing the rod's span into thirds. For the absolute strongest setup, you can install a solid shelf just above the rod and attach the support brackets directly to that shelf. This distributes the weight across the entire closet structure instead of just a few small points on the wall. It’s a bit more work, but for a truly heavy-duty hanging closet rod, it delivers total peace of mind.
Organizing Your Closet to Maximize Hanging Space
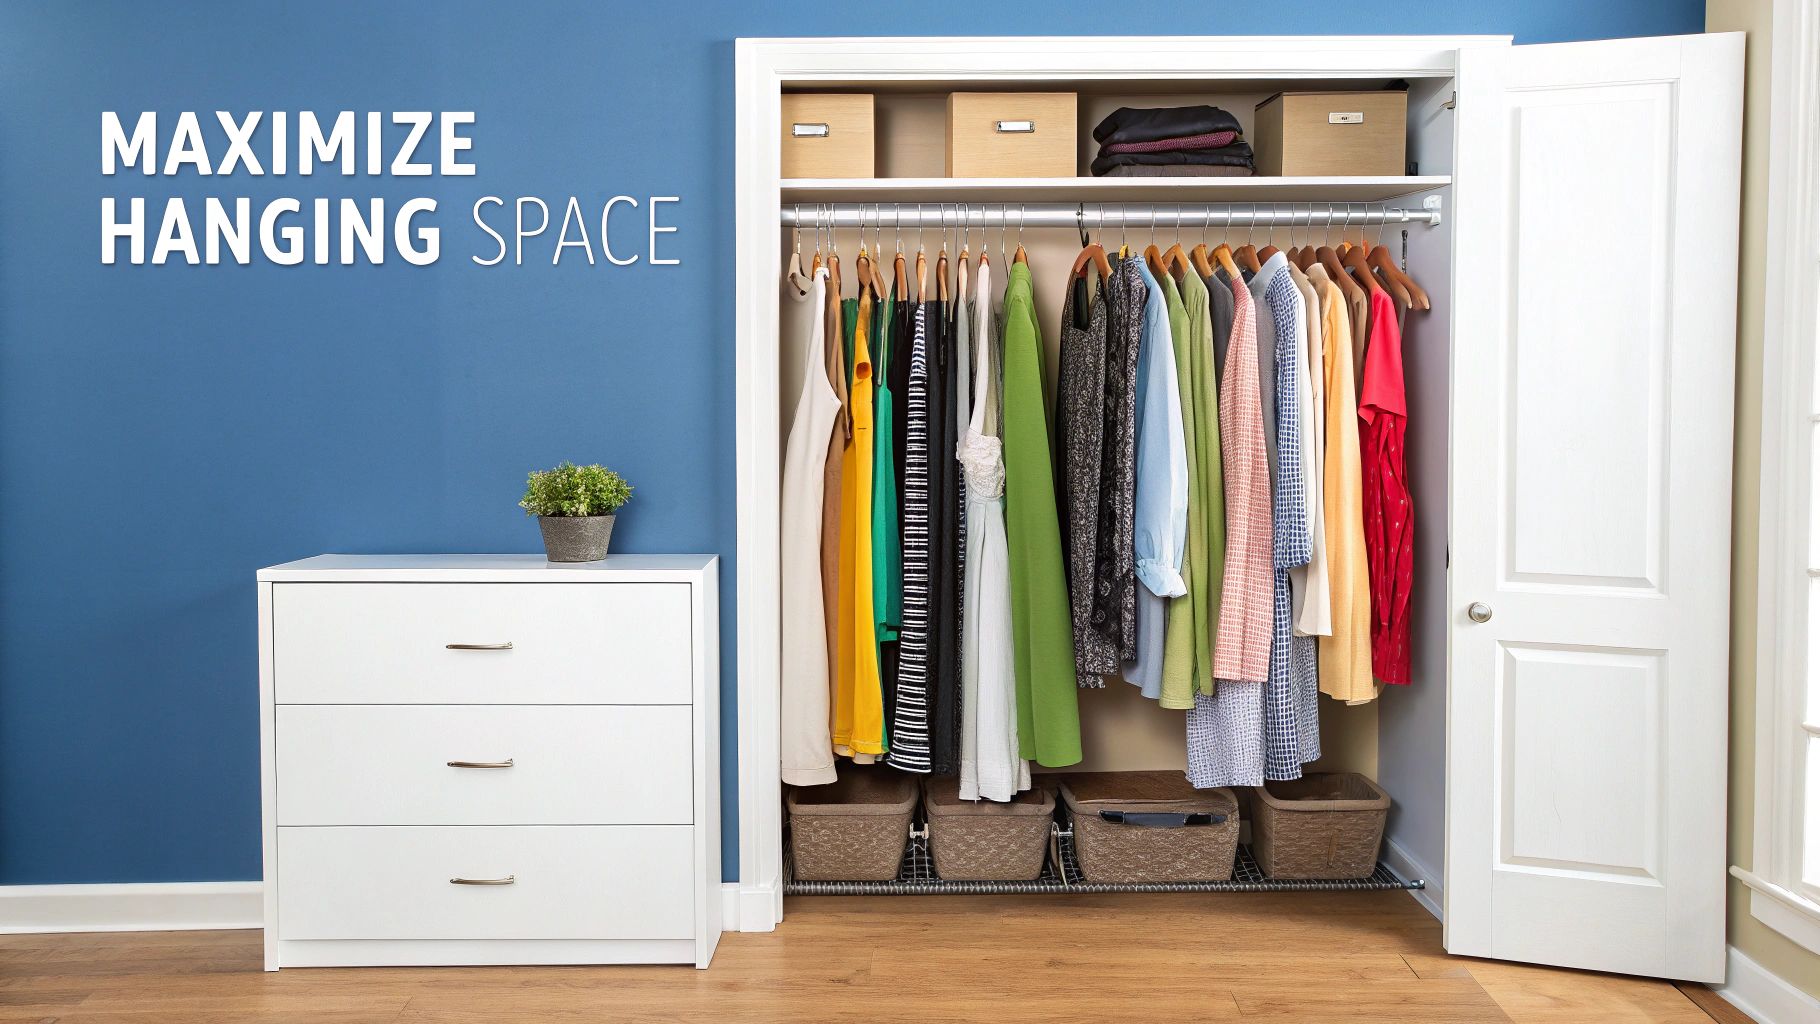
You’ve done the hard work and installed a strong, secure hanging closet rod. That’s the foundation. Now for the fun part: turning that hardware into an organization system that actually makes your daily routine easier.
Let’s be honest, the real goal here is to stop that frantic morning search for the one shirt you actually want to wear. When you organize your wardrobe with a little intention, your new rod becomes the centerpiece of a closet that just works.
Create a System with Strategic Grouping
The single most effective trick for closet organization is also the simplest: group like items together. It’s what professional organizers do first because it instantly cuts through the chaos. All your t-shirts get a section, dresses get another, pants have their own spot, and so on.
Suddenly, you can see exactly what you have. No more buying a third black V-neck because the other two were buried. This method also shows you where the real gaps are in your wardrobe, so your next shopping trip is much more focused.
Want to take it to the next level? Organize each of those groups by color. Arranging your clothes from light to dark or in a rainbow pattern (ROYGBIV) is not only satisfying to look at, but it’s incredibly practical. It’s a small tweak that saves a surprising amount of mental energy every day.
Double Your Space with a Second Rod
For most standard closets, adding a second rod to create a double-hang system is an absolute game-changer. You can literally double your usable hanging space with one simple addition, transforming your closet's organizational capacity.
I love this setup because you can organize clothes based on where you wear them on your body. It sounds a little silly, but it works on a subconscious level, making it feel more intuitive.
- Top Rod: Perfect for shorter items like shirts, blouses, and jackets.
- Bottom Rod: Ideal for pants (folded over a hanger) and skirts.
Arranging your clothes this way just clicks—it mirrors how you get dressed. You can find tons of DIY closet organizer ideas to see how you can customize a double-hang system for your own closet.
The Unsung Hero of Organization: Hangers
Never underestimate the power of good hangers. A random mix of bulky plastic and wire hangers creates visual noise and wastes a ton of space. Switching to a uniform set is one of the fastest, most satisfying organizational upgrades you can make.
Slim velvet hangers are popular for a reason. Their non-slip grip stops silky tops from ending up on the floor, and their thin profile can free up up to 30% more space on your rod compared to those chunky plastic ones.
"I always tell my clients that investing in quality hangers is non-negotiable. It's not just about aesthetics; it's about protecting your clothing and maximizing every single inch of rod space. It’s the difference between a stuffed, chaotic closet and a neat, accessible wardrobe."
For things like pants or tank tops, look for multi-garment hangers. A single hanger that can hold five pairs of pants consolidates a bulky category into a tiny footprint.
This same idea of maximizing vertical space can be applied all over the house. Think about how laundry cabinets with hanging rods can create a dedicated spot for air-drying clothes, keeping things tidy and off the floor.
When you pair a sturdy rod with these simple organizational strategies, you turn a piece of hardware into a system that brings a little more calm to every single day.
Answering Your Top Questions About Hanging Closet Rods
Even with the best instructions, a few questions always seem to come up when you're in the middle of a closet project. Let's clear up some of the most common ones so you can finish the job with confidence and get your wardrobe in order.
What’s the Standard Height for a Closet Rod?
You'll hear a lot of "standard" measurements thrown around, but the truth is, the perfect height really depends on your clothes. The industry guidelines are a great place to start, but you should always tailor them to your organizational needs.
For a closet with a single rod meant for longer items like dresses, coats, or jumpsuits, a good starting point is about 66 inches up from the floor. This usually gives plenty of room to prevent anything from dragging.
If you're installing a double-hang system to maximize space, the measurements shift:
- The top rod typically goes around 80-82 inches from the floor.
- The bottom rod is usually set at 40-42 inches from the floor.
My Pro Tip: Before you drill a single hole, grab the longest piece of clothing you plan to hang on that rod. Hold it up against the wall where you think the rod should go. Make sure there are at least 4-6 inches of clearance from the bottom of the garment to the floor (or the shelf below it). This simple, real-world check is always more accurate than a generic number.
How Much Weight Can a Closet Rod Actually Hold?
This is the big one. I’ve seen more than a few collapsed closets because people seriously underestimated the weight of their clothes. The holding power of a rod comes down to three things: its material, its length, and—most importantly—how it’s mounted.
A standard steel rod, when properly secured into wall studs, can generally support somewhere between 50 and 75 pounds. But that number drops fast as the rod gets longer. If you have a span wider than 48 inches, you absolutely need a center support bracket. Don't skip it. It’s crucial for preventing that dreaded sag and spreading the weight evenly.
Tension rods? They're a completely different story. Think of them as a light-duty solution. Most can't handle more than 20 pounds, so they’re best saved for a handful of shirts, baby clothes, or scarves.
Can I Put Up a Rod Without Drilling Holes?
Yes, you definitely can! This is a huge relief for renters or anyone who just doesn't want to leave permanent marks.
Your best bet for a damage-free option is a quality tension rod. It uses a spring-loaded mechanism to create a tight fit between two walls—no screws, no drills, no mess. Just be mindful of those weight limits we just talked about.
If you have a lot of heavy clothes but can't drill, it's time to look at a freestanding closet system or a sturdy garment rack. These are basically pieces of furniture that give you all the hanging space you need without ever touching the walls. They’re the perfect non-permanent fix for apartments or temporary living spaces.
Ready to transform your closet from cluttered to streamlined? MORALVE offers a complete range of space-saving hangers designed to maximize every inch of your new hanging rod. Discover the perfect solution for your wardrobe at https://moralve.com.
Leave a comment