Closet Zen: Your Expert Drawer Organizer DIY Guide

A custom drawer organizer DIY project is one of the most satisfying ways to turn a chaotic closet drawer into a perfectly organized space. It's all about creating dividers from simple materials like cardboard or foam board, measured and cut to fit your specific drawers and hold exactly what you need. No more wasted space.
Tackle Closet Clutter With A Custom DIY Organizer
Let's be real for a moment. Messy drawers are almost always the epicenter of closet chaos. That daily hunt for a matching pair of socks or that one favorite t-shirt can quickly turn a calm morning into a stressful scramble. Store-bought organizers seem like an easy answer, but they almost never fit just right, leaving you with awkward gaps and dead zones that just end up collecting more clutter.
This is where a custom drawer organizer DIY project really shines. When you build your own, you're in the driver's seat. You get to design a layout that’s made-to-measure for your wardrobe and your drawers.
Why A Custom Approach Works Best
A DIY solution gives you the power to create a specific home for every single item. Just imagine—compartments perfectly sized for your rolled-up belts, a spot for your neatly folded scarves, and a section just for stacked tank tops. This isn't just about cleaning up; it's about creating a system that makes staying organized feel second nature. You get to decide the size, shape, and number of compartments based on what you actually own, not some generic, one-size-fits-all template.
Of course, before you start building, it's a huge help to clear out the things you don't need anymore. Check out these expert tips for decluttering to pare down your collection. It makes organizing what's left so much simpler.
The move toward personalized home solutions is bigger than ever. The global market for craft drawer organizers—a close relative of closet DIYs—was valued at a staggering $1.2 billion and is projected to climb to $2.08 billion by 2033. This boom shows just how many people are embracing custom organization, especially in closets where every inch is precious.
By creating dividers yourself, you're not just organizing; you're designing a functional extension of your personal style. It’s the difference between a closet that works for you versus one you have to work against.
In the next sections, we'll get into the nitty-gritty of the materials you can use—from sturdy cardboard to versatile foam board—that make this project totally doable, no matter your budget or crafting skills. Get ready to finally have the calm, stress-free closet you've always wanted.
Gathering Your Tools And Materials
Before you even think about making that first cut for your drawer organizer DIY project, let's get your workspace set up. Trust me, having everything you need within arm's reach is the secret to a smooth, frustration-free build. It keeps you in the creative zone instead of constantly searching for that one thing you forgot. The best part? You probably already have most of this stuff lying around the house.
Every great DIY project starts with accurate measurements and clean cuts. These are the two things you absolutely can't skimp on.
- A Reliable Measuring Tape: Think of your measurements as the blueprint for your organizer. Precision here is everything. Make sure to double-check the drawer's interior length, width, and height before you do anything else.
- A Sharp Craft Knife or Box Cutter: A sharp blade is not just more effective, it's safer. It’s what will give you those clean, crisp edges on cardboard or foam board, stopping any ugly tears or jagged lines in their tracks.
- A Self-Healing Cutting Mat: This is a non-negotiable for protecting your work surface, whether it's a nice table or your floor. It gives you a safe, durable surface to cut on and helps keep your blade sharper for longer.
Choosing Your Adhesive
The glue you pick really dictates how permanent and sturdy your new closet drawer dividers will be, and each type has its own sweet spot. A hot glue gun, for example, is brilliant for quickly tacking cardboard pieces together since it sets almost instantly. This lets you build and test your layout on the fly.
But if you're stepping up to wood or plywood for a more permanent fix, you'll need a quality wood glue. It creates a bond that’s often stronger than the wood itself, ensuring your dividers can handle years of daily use. For even more ideas, check out our guide on creating a closet organizer DIY from the ground up.
Pro Tip: When using a hot glue gun, work in small sections. Apply the glue, then hold the pieces together firmly for about 10-15 seconds. This gives the glue enough time to set up a strong bond before you move on, so your structure doesn't shift while it cools.
Elevating The Look With Finishing Supplies
Function is king, but there’s no reason your DIY drawer organizer can't look amazing, too. A few simple touches can give your project a polished, high-end feel that makes your whole closet look more put-together. These finishing touches are totally optional, but they really make a difference.
Think about using some of these materials to give your organizer a custom look:
- Decorative Contact Paper: With endless patterns and colors, contact paper is a super easy way to cover cardboard or foam board. It not only looks great but also adds a durable, wipeable surface that you can match to your room's decor.
- Fabric Scraps: Got some leftover fabric? Covering your dividers with it adds a soft, luxurious touch. It's perfect for protecting delicate things like jewelry or sunglasses. A little spray adhesive is all it takes.
- Paint or Primer: For wooden dividers, a quick coat of paint seals the wood and gives everything a clean, uniform look. You can go with a simple white or a pop of an accent color to completely transform the inside of your drawer.
How to Build Your Custom Drawer Dividers
Alright, this is where the fun starts. You've got your measurements and materials, and now it's time to turn that pile of raw goods into a perfectly functional, custom-fit drawer organizer DIY solution.
I'm going to walk you through three of my favorite methods, each with its own pros and cons depending on your skill level and what you need the organizer to do. Whether you're starting with a simple cardboard box or graduating to real wood, the core process is always the same: measure, cut, and assemble.
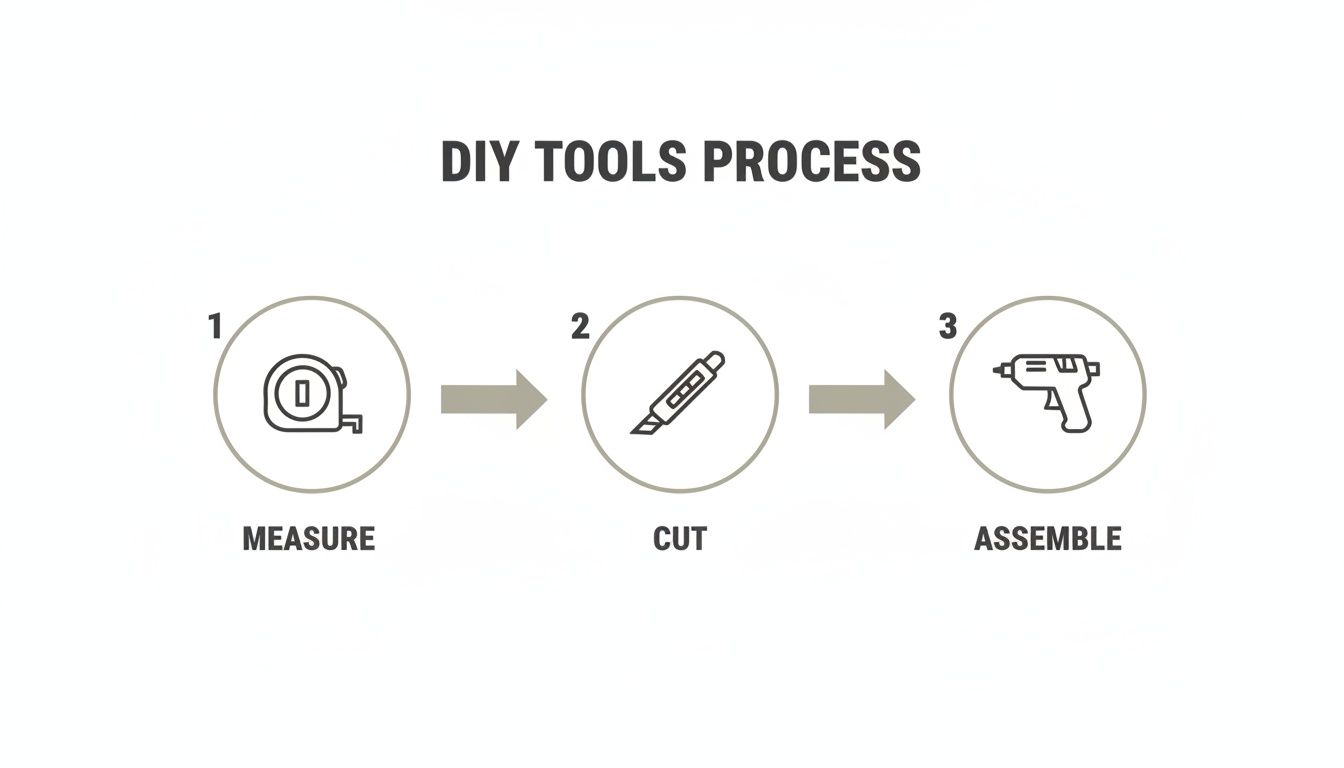
Get these three steps right, and you’ll end up with a clean, professional-looking organizer that fits like a glove.
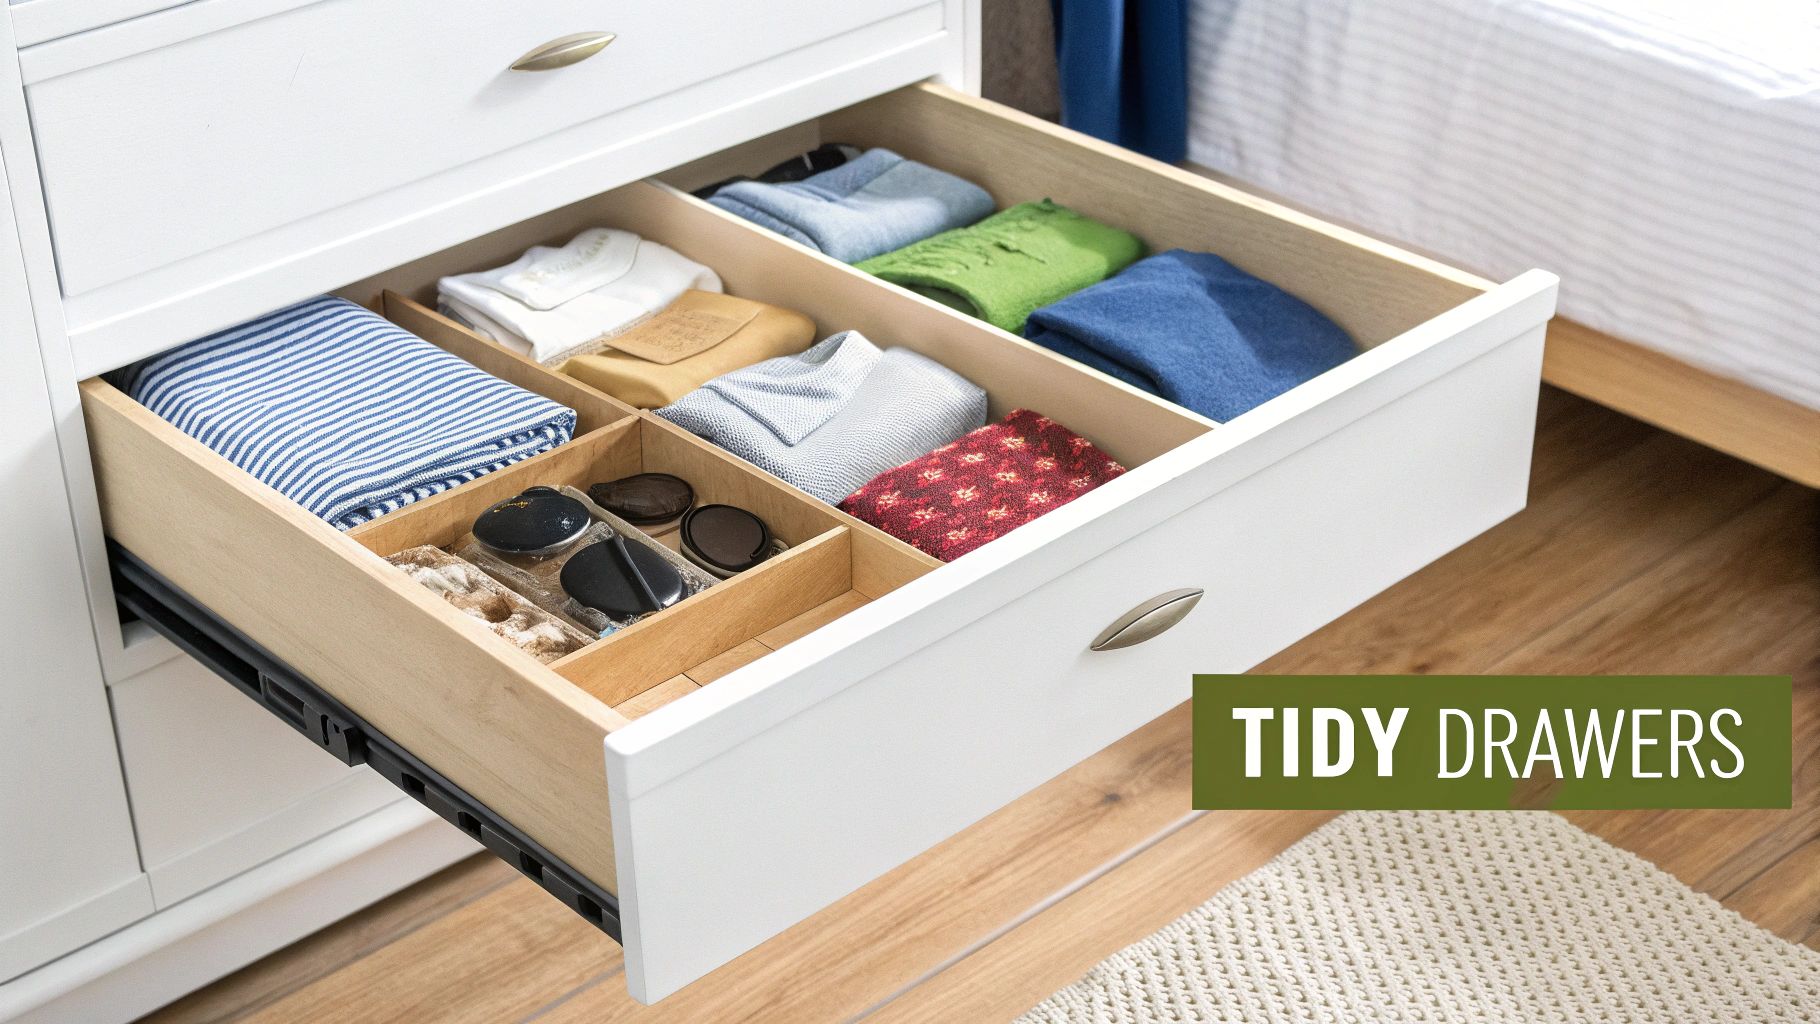
The No-Cost Cardboard Grid
If you're new to this, the cardboard grid is the perfect place to start. It's often free (thank you, online shopping!), surprisingly tough, and super forgiving if you make a mistake. This method is brilliant for lightweight items like socks, underwear, ties, or rolled-up tank tops.
First, cut your cardboard strips. You'll need two sets:
- Lengthwise Strips: These will span the full length or width of your drawer. I always cut them about a quarter-inch short so they slide in and out easily.
- Crosswise Strips: These are your shorter pieces that will create the individual cells.
The trick to making them connect is to create interlocking slots. On your main lengthwise strips, mark where you want your dividers. Using a craft knife, carefully cut a slit halfway through the height of the cardboard at each mark. Do the same thing on your crosswise strips, but cut the slits from the opposite edge. When you slide them together, the slots lock into place, creating a surprisingly stable grid.
Leveling Up to Foam Board Dividers
For a cleaner look and a bit more rigidity, foam board is a fantastic choice. You get all the customizability of cardboard but with a more polished, professional finish. I find it works really well in visible closet drawers or for organizing delicate things like scarves and nice accessories.
The process is pretty similar to the cardboard method, but you'll want to be a bit more precise to get that crisp look.
Measure your drawer and cut your main foam board pieces to size. Here, instead of slots, a hot glue gun becomes your best friend. Run a thin, steady line of hot glue along the edge of a crosswise divider and press it firmly against your main lengthwise piece. Hold it steady for 15-20 seconds until the glue cools and sets. A small T-square (or even a thick book) is great for making sure your joints are perfectly square at 90 degrees.
Pro Tip: For an ultra-clean look, sketch out your layout on a piece of paper first. It helps you visualize the end result and avoid any misplaced glue or crooked dividers. A little planning here can make a simple foam board project look like a high-end custom insert.
Building Permanent Wooden Inserts
When you’re ready for a serious, long-term upgrade, custom wooden dividers are the way to go. Thin hobby boards, like poplar or pine from a craft or hardware store, are perfect for this. They're lightweight but incredibly strong, making them ideal for containing heavier items like bulky sweaters or stacks of denim.
This is where your measurement and cutting skills really shine. A simple miter box and a hand saw can give you surprisingly straight cuts, but if you have a miter saw, the job gets done even faster.
Cut your main boards to fit the length and width of the drawer. If you want a truly pro-level, adjustable system, you can cut a series of shallow notches (these are called dadoes) along your main dividers. These little grooves allow the crosswise pieces to slot in securely without any glue, giving you the freedom to rearrange your compartment sizes whenever you want.
Adapting Your Design for Different Drawers
Let's be real—not all drawers are the same. A shallow sock drawer needs a completely different approach than a deep one meant for t-shirts.
- For Shallow Drawers (socks, underwear, etc.): Think small, square compartments. A classic grid layout works perfectly here. It keeps small items from turning into a jumbled mess and lets you see everything at a glance.
- For Deep Drawers (t-shirts, sweaters): You'll want longer, rectangular compartments designed for file-folding. Folding your clothes vertically lets you pack more in and still see every single item. I always recommend running your lengthwise dividers from the front of the drawer to the back for easy browsing.
The demand for these custom solutions is huge. We're seeing data that shows DIY projects can slash the need for store-bought organizers by 20%. Just look at Pinterest, which hosts over 2.5 million pins for "drawer organizer DIY," with a whopping 60% coming from the fashion and home organization communities. This trend is a perfect match for products like MORALVE's hangers, as people create coordinating drawer inserts for tank tops and skirts, boosting their total closet efficiency by an estimated 25%—a real game-changer in smaller apartments. You can dig into more data about the growing craft organizer market and its impact online.
Adding Finishing Touches and Smart Labels
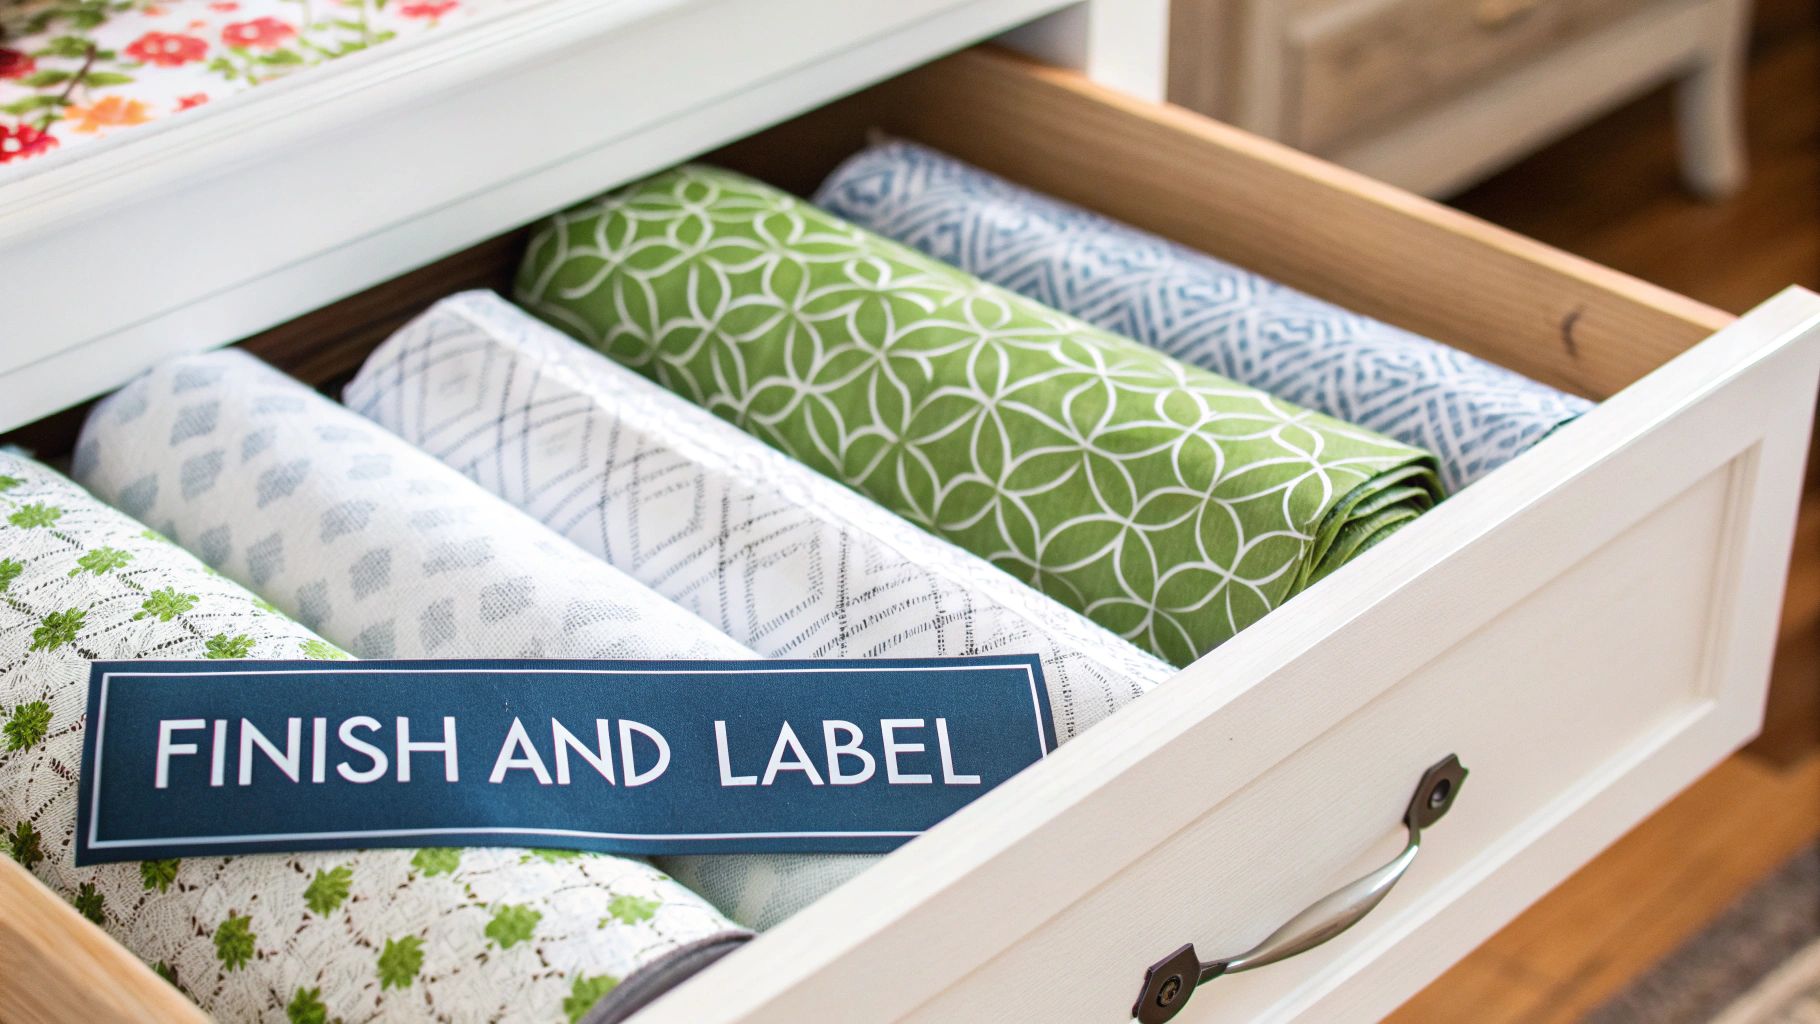
You've built the bones of your drawer organizer DIY project, which is fantastic. But now for the fun part—the details that take it from a functional build to a truly polished and intuitive system. These final touches are what make your organization sustainable in the long run. It's the difference between a project that screams "homemade" and one that looks like a high-end custom job.
This stage is all about blending personality with pure function. Take a look at the overall aesthetic of your closet and bedroom. A few simple additions can tie your new organizer into the existing decor, making it feel like it's always been there instead of being a clunky afterthought.
Personalizing Your Dividers
Plain cardboard or wood gets the job done, but adding a decorative finish gives your project style and a surprising amount of extra durability. This is especially true if you used cardboard; that extra layer can be a lifesaver against scuffs, snags, and even a little moisture.
Here are a few ways I like to add that professional finish:
- Stylish Contact Paper: This is easily the fastest way to inject color and pattern. Modern contact paper comes in endless designs, from realistic wood grains to cool geometric prints. Plus, its vinyl surface makes the dividers a breeze to wipe clean.
- Fabric Scraps: For a softer, more luxurious feel—perfect for drawers with delicates or nice jewelry—try covering your dividers with leftover fabric. A quick pass with some spray adhesive is all it takes to create a plush, non-scratch surface.
- A Fresh Coat of Paint: If you went the wood or plywood route, a simple coat of paint or sealer works wonders. It protects the wood from dings and gives the whole drawer a clean, cohesive look. I often go with white or a light neutral; it makes the drawer interior feel brighter and bigger.
These finishing touches aren't just for looks. They genuinely create a more pleasant experience. When your organizer is visually appealing, you’re far more likely to feel motivated to actually keep it tidy.
Implementing Smart Labeling Strategies
An organizer without labels is a job half-done. A clear labeling system is the secret sauce that removes all the guesswork, making it effortless to find what you need and put things back where they belong. This is the key to making your new system stick. In fact, studies show that simple visual cues like labels can improve task efficiency by a whopping 25-50%. Think about what that means during a hectic morning!
The goal is to create a system so simple you don't even have to think about it. For example, in a sock drawer, labels like "Athletic," "Dress," and "Casual" stop you from having to rummage through the entire pile. If you're looking for more systems to keep your whole wardrobe in check, you can find more expert techniques for how to organize clothes drawers right here.
Choosing The Right Labeling Method
The best kind of label really depends on your style and how often you plan on switching up the contents of a compartment.
| Label Type | Best For | Pro Tip |
|---|---|---|
| Chalkboard Labels | Frequently changing contents | Use a chalk marker instead of regular chalk. You get a cleaner, smudge-proof finish that still wipes away easily. |
| Printed Labels | A uniform, polished look | A label maker is your best friend here. Choose a clear, simple font for crisp, durable labels that look super professional. |
| Metal Rim Tags | A classic, vintage aesthetic | These are great for a decorative touch. You can tie them on or attach them with tiny brads for a more permanent feel. |
| Permanent Markers | The simplest, no-fuss option | Just write directly on your wooden dividers! For a less permanent but still minimalist look, write on a strip of masking tape. |
If you want to get serious about longevity and clarity, you could even explore using durable Traffolyte labels for a truly permanent, industrial-quality solution. By pairing a beautiful finish with a practical labeling system, your custom drawer organizer DIY project becomes a true powerhouse of closet efficiency.
Creating a Complete Closet Organization System
You’ve sorted out your drawers, which is a huge win against closet chaos. But the real magic happens when your drawer organizer DIY project becomes part of a bigger, more cohesive system. It's time to connect the dots between your neatly organized drawers and your hanging space to create a closet that truly works for you.
This isn't about a massive overhaul. It's about smart integration. When you pair your custom dividers with the right hanging solutions, you create a powerful duo that maximizes every last inch of your wardrobe. The goal is to make getting ready in the morning feel intuitive and completely stress-free.
Pairing Drawers With Smart Hanging Solutions
Think of your closet as having two main zones: drawers for folded stuff and rods for everything else. The secret is knowing what goes where. Your new drawer organizers are now the perfect home for items that can be rolled or folded without turning into a wrinkled mess.
This is where specialized hangers, like the space-saving options from MORALVE, really shine. By strategically moving certain items from your drawers onto these hangers, you free up a ton of valuable drawer real estate.
- Pants and Skirts: Instead of trying to awkwardly fold bulky jeans or delicate skirts, switch to tiered pant hangers. This one change can honestly free up an entire drawer, which you can now use for t-shirts or workout gear.
- Tank Tops and Camisoles: A single tiered tank top hanger can hold several tops in the same vertical space that one regular hanger takes up. Just like that, you’ve cleared out a drawer that was once a jumbled mess of straps.
- Delicates and Accessories: With the bulkier clothes now hanging, your DIY dividers can be dedicated to what they do best: housing delicate underwear, socks, scarves, and belts in their own perfect little spots.
By making these simple shifts, your custom-built compartments are freed up to keep small, foldable items neatly contained and easy to see at a glance.
The harmony between smart drawer organization and efficient hanging storage is what transforms a standard closet into a high-functioning wardrobe. It’s a system where every piece of clothing has a logical, accessible home.
Practical Closet Layouts for Any Space
This integrated approach is a lifesaver no matter what size closet you're working with. The principles of assigning items to either drawers or hangers are the same, but you can adapt the execution to fit your space.
For those of us in smaller apartments, this system is a total game-changer. The household organizer market is booming, expected to grow from $7.3 billion to $12.5 billion, and creative DIY projects are a huge part of that. For the MORALVE community, many of whom are apartment dwellers, these hacks are essential for organizing accessories right alongside space-saving pant and skirt hangers. It's interesting—while unique DIY projects might slow the growth of ready-made products, they also boost overall market interest by as much as 25% through social sharing. You can discover more insights about the household organizer market and its drivers.
Let's look at how this synergy plays out in different closet scenarios:
| Closet Type | Drawer Strategy | Hanging Strategy |
|---|---|---|
| Compact Wardrobe | Use dividers for all smalls—socks, underwear, belts. File-fold t-shirts. Every single item needs its own compartment. | Maximize every inch of vertical space with tiered hangers for pants, skirts, and tank tops. Use slim velvet hangers to fit more shirts. |
| Standard Reach-In | Dedicate entire drawers to specific categories. For example, one for activewear, one for pajamas, and another for accessories. | Use the main rod for your daily go-to's like shirts and dresses. An add-on rod or tiered hangers work great for trousers and items you wear less often. |
| Spacious Walk-In | Think beyond the basics. Create dedicated drawers for seasonal items, like swimwear in the summer or hats and gloves in the winter. | Create distinct zones for different clothing types—a section for workwear, one for casual clothes, and another for formal attire. |
By thoughtfully combining your new drawer organizer DIY with the right hanging tools, you stop seeing your closet as just one big storage box and start treating it as a dynamic, zoned system. To take this concept even further, check out our complete guide on building a DIY closet organizer that covers everything from shelving to rod placement. This holistic view is the final step toward achieving lasting closet peace.
Common Questions About DIY Drawer Organizers
Even the simplest drawer organizer DIY project can spark a few questions. And honestly, getting these little details right is what makes the difference between a wobbly, temporary fix and a sturdy, long-lasting solution you'll love for years.
I've built dozens of these, and certain questions come up time and time again. Let's walk through them so you can start your project with total confidence.
What’s the Best (and Cheapest) Material to Use?
Hands down, for a project that's both cheap and incredibly easy, corrugated cardboard is the winner. You can usually get it for free from old shipping boxes, it cuts cleanly with a simple craft knife, and a hot glue gun brings it all together in minutes. If you're new to DIY, this is your perfect starting point.
Now, I know what you might be thinking—cardboard isn't exactly a permanent solution. But a well-made cardboard organizer can easily last for years, especially when it's tucked away inside a drawer, safe from daily wear and tear.
Want to give it a little boost? Covering it with decorative contact paper not only looks great but also adds a surprising amount of durability. If you're willing to spend just a little more for a sturdier, more polished look, foam board is another fantastic, budget-friendly option.
How Do I Keep My Dividers From Sliding Around?
There's nothing worse than hearing your carefully made organizer slide and clatter every single time you open the drawer. The best defense against this is a super snug fit. When you're measuring your drawer, be precise. Cut your main organizer pieces to match those dimensions perfectly, and that will solve 90% of the problem right there.
If you still have a small gap after everything is assembled, don't sweat it. Here are a few easy fixes I've used:
- Create a little tension. Wedge small, folded pieces of felt or craft foam at the ends of the dividers. This creates just enough pressure to hold them securely against the drawer walls.
- Add some grip. Those little clear cabinet door bumpers are a lifesaver. Stick a few on the ends of your dividers—their rubbery texture grabs onto the drawer sides and stops any movement.
- Use a liner. Before you even put the organizer in, lay down a non-slip drawer liner. The whole unit will stay firmly in place.
Another trick I love is using small dabs of museum putty or removable double-sided tape on the bottom edges of the dividers. It provides a gentle hold without damaging your drawers.
A snug-fitting organizer is a quiet, stable organizer. Taking an extra minute to ensure a tight fit is one of the most impactful things you can do for the long-term function of your project.
What Kinds of Items Work Best With DIY Dividers?
Custom dividers are an absolute game-changer for all those small, rollable, or foldable items that tend to dissolve into a jumbled mess. They're designed to bring order to the most chaotic corners of your closet.
They are absolutely perfect for things like:
- Socks and underwear
- Ties, belts, and scarves
- Rolled-up tank tops and leggings
- Delicate accessories like sunglasses or watches
I also find them incredibly useful for file-folding t-shirts. If you haven’t tried this method, it's brilliant—you fold your shirts and store them vertically, so you can see your entire collection at a glance. By dedicating your drawers to these smaller items, you free up a ton of hanging space for clothes that really need it, like blouses, dress pants, and jackets. It’s a simple way to optimize your entire closet.
Is It Possible to Make My DIY Organizers Adjustable?
Absolutely! In fact, building some adjustability into your drawer organizer DIY is a really smart move. Your storage needs change over time, and your system should be able to adapt right along with you.
The easiest method is to create tension-fit dividers. Instead of gluing every single joint, just cut your shorter, crosswise dividers to fit snugly between the main lengthwise pieces. The friction alone will hold them in place, but you'll still be able to slide them around to create larger or smaller compartments whenever you need to.
For a more advanced wood or plywood build, you can cut a series of evenly spaced notches along your main dividers. This lets you slot the intersecting pieces into different positions, creating a truly modular system you can reconfigure in seconds.
When you pair these custom drawer solutions with smart hanging strategies, your closet becomes a fully optimized space. For hangers that save an incredible amount of room and perfectly complement your new drawers, check out the innovative designs from MORALVE. See how their specialized hangers for pants, skirts, and tank tops can help you build a truly cohesive organization system at https://moralve.com.
Leave a comment